Studio Creation and Configuration Workflow
- Dominant language
- Scala
- Stars
- 301
- Forks
- 76
- PR merge metrics
- No merged PRs in 30d
Description
## Motivation
Users should be able to create, edit and publish Studios without technical knowledge of the underlying graph structure, resource properties and relationships, SPARQL, Elasticsearch query interface.
## Related work
Existing studios.
Air tables: https://airtable.com/
NocoDB: https://www.nocodb.com/
## Glossary
**Studio**: a minimal website
- it has a title.
- it has a description (markdown only); it should not accept images, videos or other widgets - note: currently this is not the case as of v1.5x
- it has a collection of Workspaces
**Workspace**: a sub-section of a Studio
- it has a title
- it has a description (markdown with possible widgets, e.g. images, videos etc.) - note this is not currently available as of v1.5.x
- it has a collection of Dashboards - note: they are currently rendered as a separate tabs as of v1.5.x, but the intention is to move towards a section of the current rendered view
- the user can switch between dashboards to change the focus
- proposed renaming: _Page_
**Dashboard**: a sub-section of a Workspace
- it has a title
- it has an optional description (markdown with possible widgets, e.g. images, videos etc.)
- it has an optional data table
- proposed renaming: _Section_
**Note**: final names will have to be confirmed, the rest of the description will continue with the current proposed naming.
## Requirements
### Create a new Studio from scratch
**Main Workflow:**
1. User logs in
2. User navigates to a specific project
3. User selects the Studio listing view
4. User clicks on Create New Studio button
The user is presented with a landing page for Studio creation where she/he can:
- name the current page
- describe in Markdown the current page
- create a new Section in the page
5. User fills in the name of the current page
6. User fills in the Page description in Markdown
7. User saves his studio and redirected to the Studio view page (with the first page of the Studio preselected)
**Secondary flow - also create a section with a description and a data table:**
7. User chooses to create a new section
8. User is presented with a search box where he/she can search for existing types in the project (The assumption is that data tables are oriented on types.)
9. User selects one of the types in the result list (the search box presents suggested values for selection); the user can only select one type (possibly multiple types in the future)
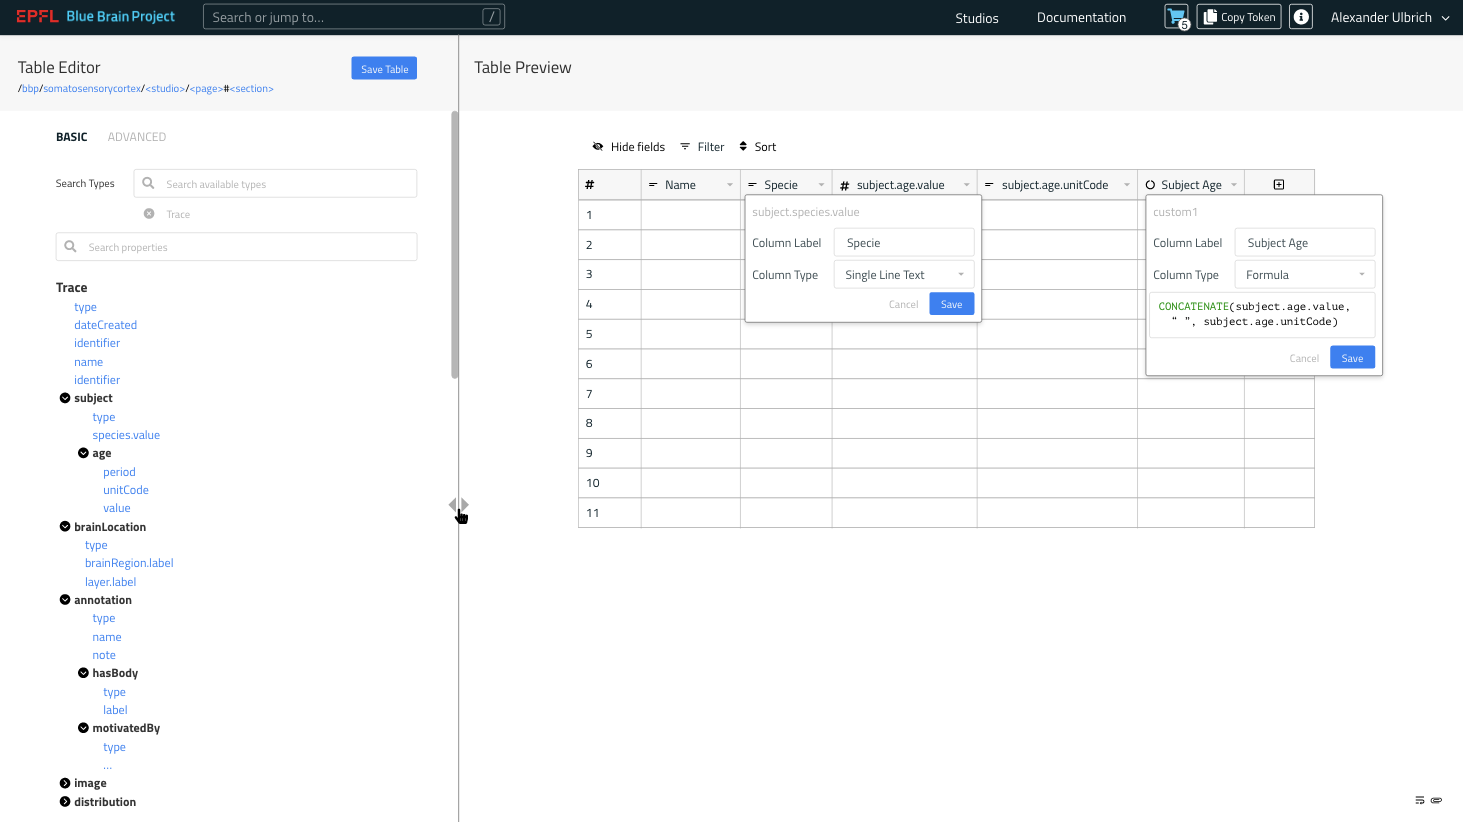
The user is presented with a tree representation of the selected type statistics (properties and relationships).
10. User selects the properties that he/she would like to be added to the data table
Upon selecting the first property, a preview of the table is rendered on the right hand side of the view (see screenshot below)
11. The user interacts with the preview of the table to:
- name each property in the table header
- apply functions to the values
- select behaviour in case the expected value type does not match for a resource or a resource does not exist
12. The user can continue to add new sections or save the current studio
**Secondary flow - create multiple pages with multiple sections:**
7. User chooses to create a new section
8. User is presented with a search box where he/she can search for existing types in the project (The assumption is that data tables are oriented on types.)
9. User selects one of the types in the result list (the search box presents suggested values for selection); the user can only select one type (possibly multiple types in the future)
The user is presented with a tree representation of the selected type statistics (properties and relationships).
10. User selects the properties that he/she would like to be added to the data table
Upon selecting the first property, a preview of the table is rendered on the right hand side of the view (see screenshot below)
11. The user interacts with the preview of the table to:
- name each property in the table header
- apply functions to the values
- select behaviour in case the expected value type does not match for a resource or a resource does not exist
12. The user create a new page
The flow recurses from 7.
**Secondary flow - remove sections from a page after their definition:**
7. User chooses to create a new section
8. User is presented with a search box where he/she can search for existing types in the project (The assumption is that data tables are oriented on types.)
9. User selects one of the types in the result list (the search box presents suggested values for selection); the user can only select one type (possibly multiple types in the future)
The user is presented with a tree representation of the selected type statistics (properties and relationships).
10. User selects the properties that he/she would like to be added to the data table
Upon selecting the first property, a preview of the table is rendered on the right hand side of the view (see screenshot below)
11. The user interacts with the preview of the table to:
- name each property in the table header
- apply functions to the values
- select behaviour in case the expected value type does not match for a resource or a resource does not exist
12. User changes his mind and removes the section he just defined
13. User saves his changes or recurses on step 7.
**Secondary flow - remove a previously created page:**
7. User chooses to create a new section
8. User is presented with a search box where he/she can search for existing types in the project (The assumption is that data tables are oriented on types.)
9. User selects one of the types in the result list (the search box presents suggested values for selection); the user can only select one type (possibly multiple types in the future)
The user is presented with a tree representation of the selected type statistics (properties and relationships).
10. User selects the properties that he/she would like to be added to the data table
Upon selecting the first property, a preview of the table is rendered on the right hand side of the view (see screenshot below)
11. The user interacts with the preview of the table to:
- name each property in the table header
- apply functions to the values
- select behaviour in case the expected value type does not match for a resource or a resource does not exist
12. The user create a new page
13. The user removes the initial page he/she created
### Studio configuration view
For existing Studios users with access must be given the option for reconfiguration through a "Configure Studio" button/link at the side of the Studio when viewing a Studio.
The main flow:
1. User logs in
2. User navigates to the Studio list
3. User selects a Studio
4. User clicks on the "Configure Studio" button (only when the user has permissions to edit studios, e.g. `studios/write`)
The user is presented with the Edit view of the respective Studio, where all the pages, sections are presented in edit mode. The type, property selections and table previews need to rendered as in the creation workflow such that the user can make any necessary changes, like creating a new page, a new section within a page or modifying any already configured parts of the Studio.
5. User makes necessary modifications
6. User saves the changes and is redirected to the Studio view page
### Data tables filtering, sorting and search
When configuring a data table within a Studio Page Section the user is presented with a set of checkboxes to control:
- whether the table is rendered with a Search bar for full text search of the fields in the table
- whether the table columns allow filtering on values
- whether table columns can be sorted
The configuration of the table only applies to viewing a table, not in edit mode.
### Deletion / deprecation of a Studio
Studios, opposed to data resources are meant for presentation purposes only which can allow complete deletion from the system. The users should be given the option to delete an existing Studio.
The user should be presented with a delete button in the Edit view of a studio. Upon clicking the button, the user will be asked for confirmation, explaining the complete purge of the information within the system about the Studio. (think Danger Zone in Github and the deletion workflow for repositories).
The user has the option to cancel the deletion when the confirmation is presented.
The permalinks will not function anymore; this is expected.
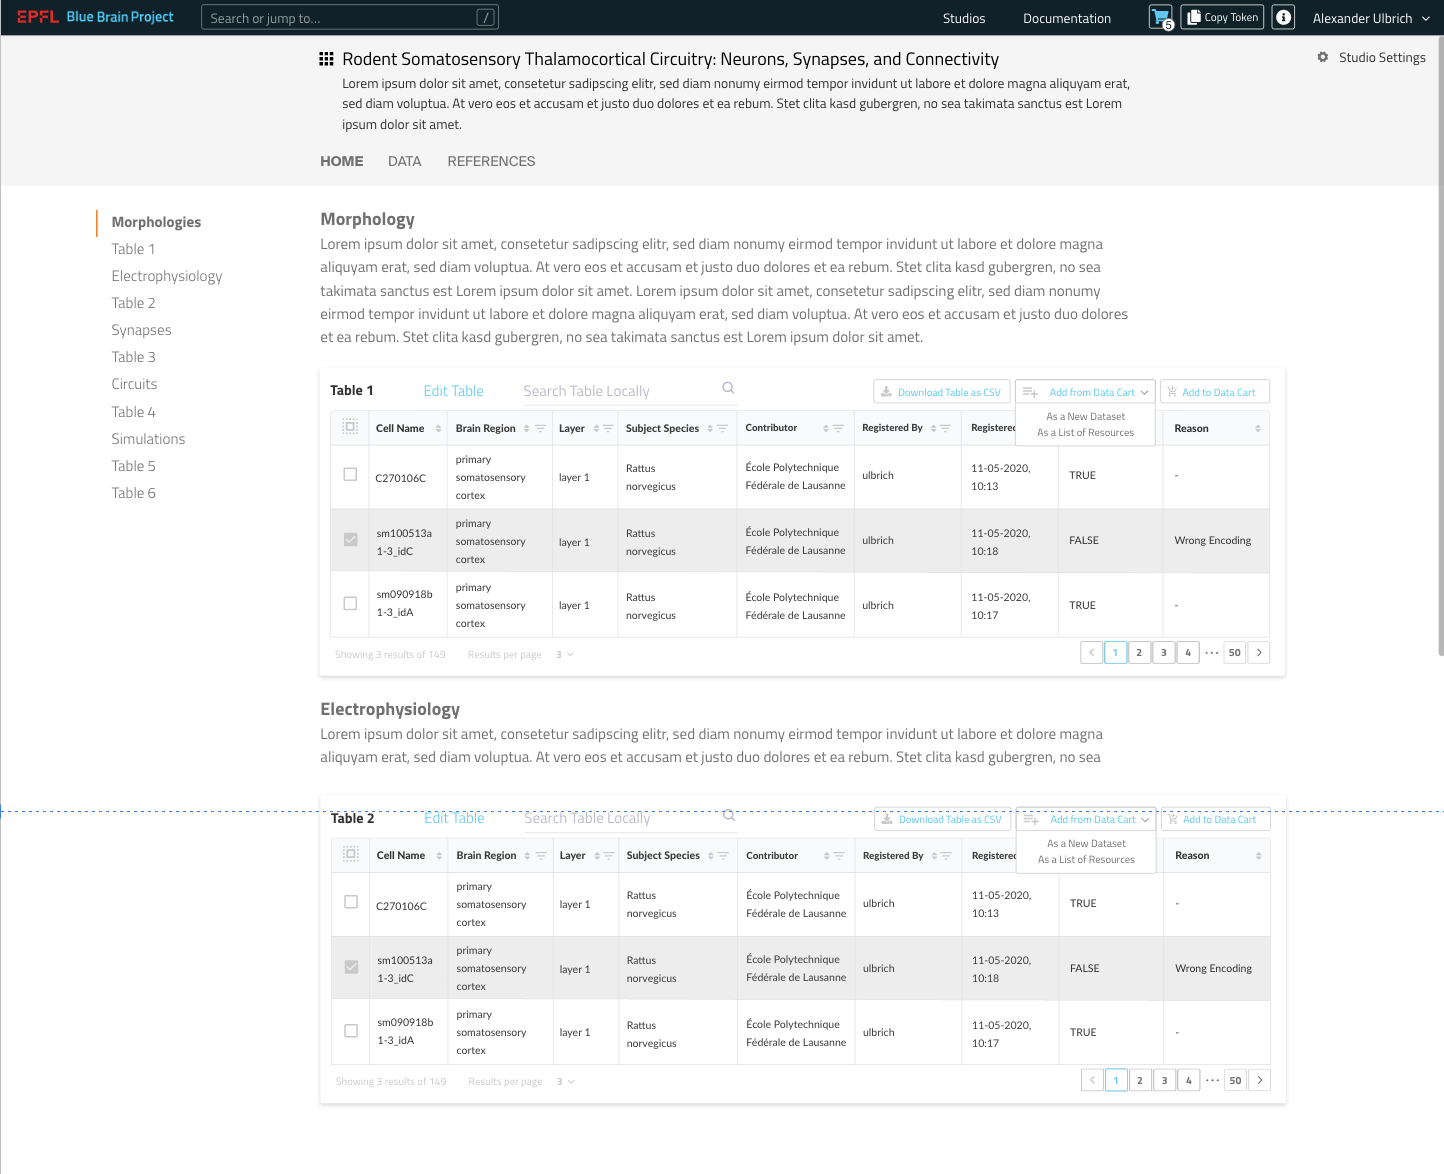
### Improve Studio view
Studios are now (as of v1.5.x) rendered as a multi function table with descriptions where different sections are switched for browsing the information. The purpose of this requirement is to improve on that and transition Studios to look more like sub-websites with multiple pages (menu at the top) where each page is made out of multiple sections, each with optional text (as a description) and data (as data tables).
An example of how the Studios should be rendered can be found below in the Screenshot section of this epic.
Proposed changes:
1. Remove from the current Studio view edit controls
2. Unfold the sections within a page (from workflows/dashboards) to display the entire content of a selected page
3. Present Studio title and description at the top of each page
4. Pages are presented as a Menu at the top
5. Sections are presented as a table of contents on the side
6. Studio controls are moved to the Edit view of a Studio; navigation towards the edit view is presented as a button/link only for people that have edit permissions
7. Enable rendering of a Studio without the Fusion menus, login, search controls (think of the Print view of a website); TBD @samuel-kerrien @adulbrich
### Deep linking of Studio Page Sections
Users tend to share links to Studios or specific parts of a Studio. In order to avoid breaking the links while evolving the Fusion routing mechanism, a custom permalink feature is required for Studios. The current URLs are very long and cannot be typed easily
Behaviour:
**When viewing a Studio Section, a link icon is positioned at the current section.**
- User clicks on the link icon
- a permalink is generated for the respective section
- the permalink is automatically copied to the clipboard, a tooltip will appear informing the user that the link has been copied
**When navigating to the generated permalink the correct Studio Page Section is presented:**
- if the section is not found, position the viewport at the parent page
- if the page is not found, position the viewport at the first page (landing page) of the Studio
- if the studio is not found, present a custom Studio not found page, where the user can navigate to listing the Studios of the current Project
**When viewing a Studio Page, a link icon is positioned next to the page title.**
- User clicks on the link icon
- a permalink is generated for the respective Page
- the permalink is automatically copied to the clipboard, a tooltip will appear informing the user that the link has been copied
**When viewing a Studio Page, a link icon is positioned next to the Studio title.**
- User clicks on the link icon
- a permalink is generated for the respective Studio
- the permalink is automatically copied to the clipboard, a tooltip will appear informing the user that the link has been copied
**Additional notes:**
- the generated slug needs to be human readable, easy to type (just like Wikipedia pages and anchors)
## Behaviour not included in this Epic
1. approval and publication flows
2. licenses
3. access control
## Responsive design
TBD @samuel-kerrien @dhaneshnm @adulbrich
## Screenshots
Studio page rendering (provisional):
Edit Studio Section / Data Table (provisional):
Contributor guide
Research direction
The issue names no files, tests, or entry points. Start by reviewing the existing Studio implementation against the creation, configuration, rendering, deletion, and permalink requirements; this work is done only when the full workflow and its unresolved naming and design decisions are implemented.
Written by the indexing model from the issue text.
Assessment
- Tech stack
- elasticsearch
- Domain
- backend, frontend
- Issue type
- Feature
- Difficulty
- 5/5
- Estimated time
- Over a week
- Activity status
- Stale
- Clarity
- Mostly clear
- Newbie friendliness
- 15/100