codestates / codestates/BanThing

[Error Handling] 배포환경에서 쿠키가 전달되지 않는 에러

Open
#190 0 comments 0 reactions 1 assignee Claimed by @greenheadHQ View on GitHub
error fatal server solved
Dominant language
TypeScript
Stars
0
Forks
2
PR merge metrics
No merged PRs in 30d

Description

### 어떤 에러인가요?
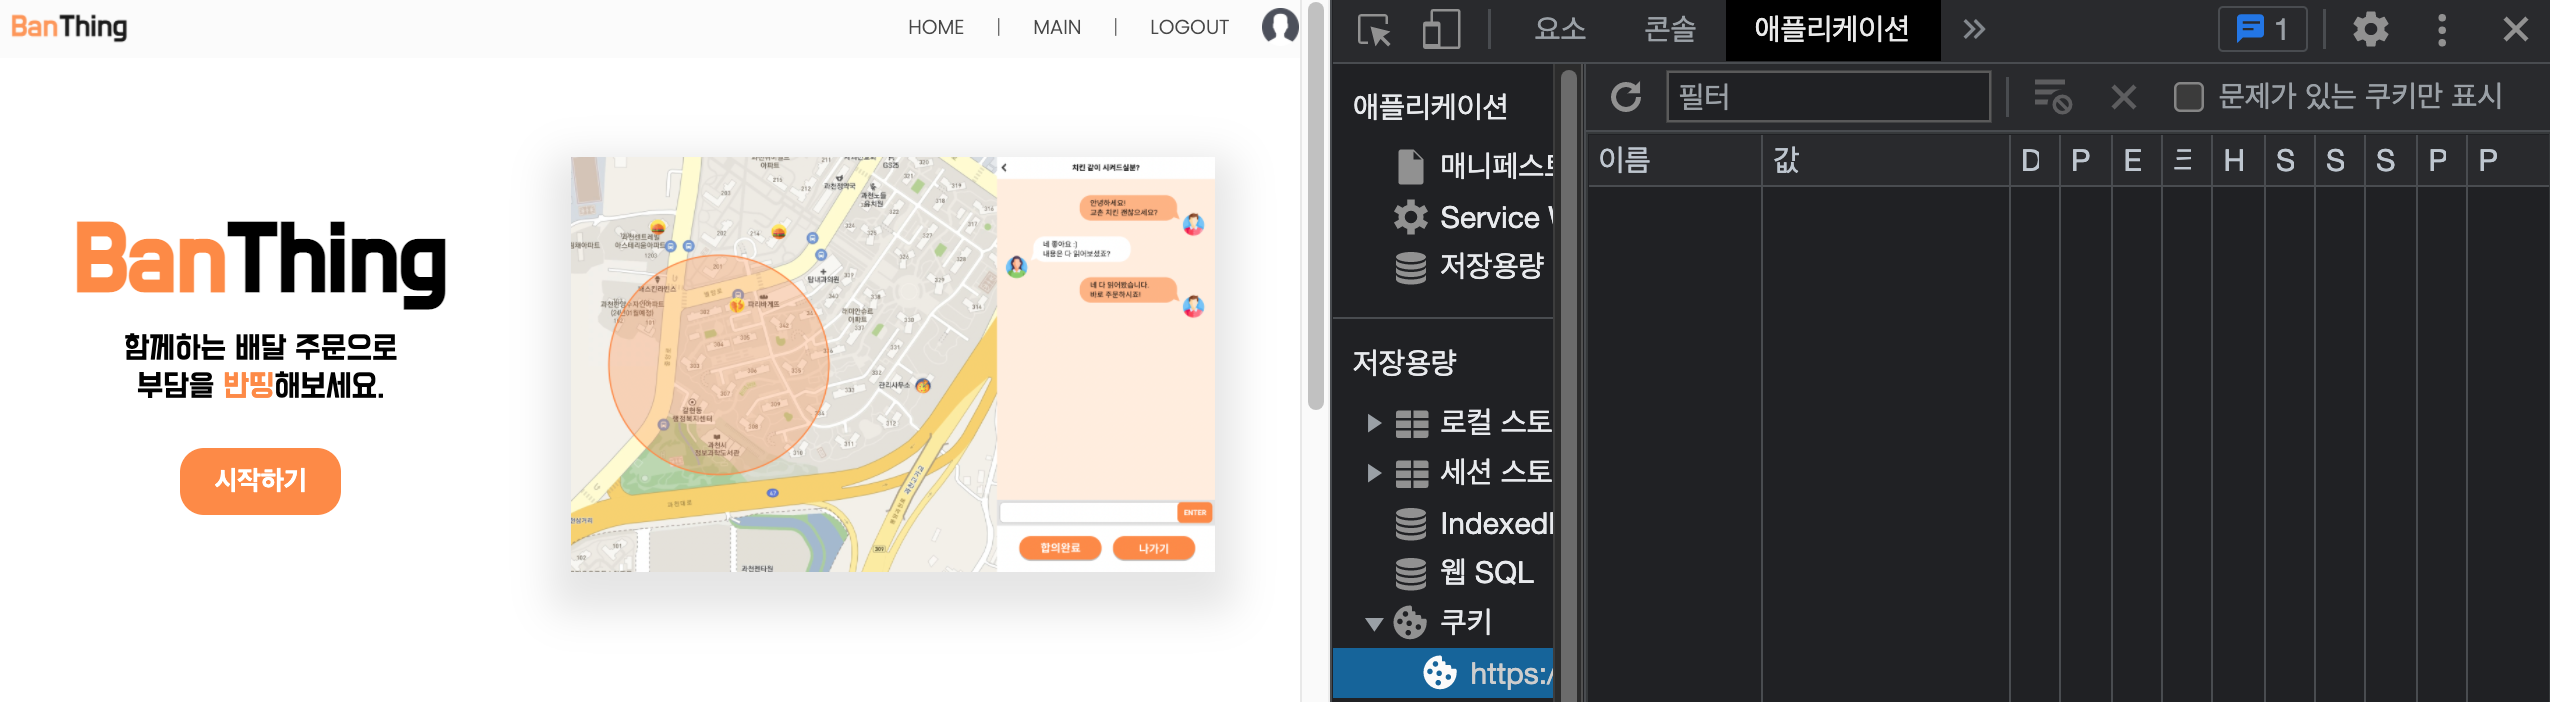
스크린샷 2022-02-26 오후 2 25 32
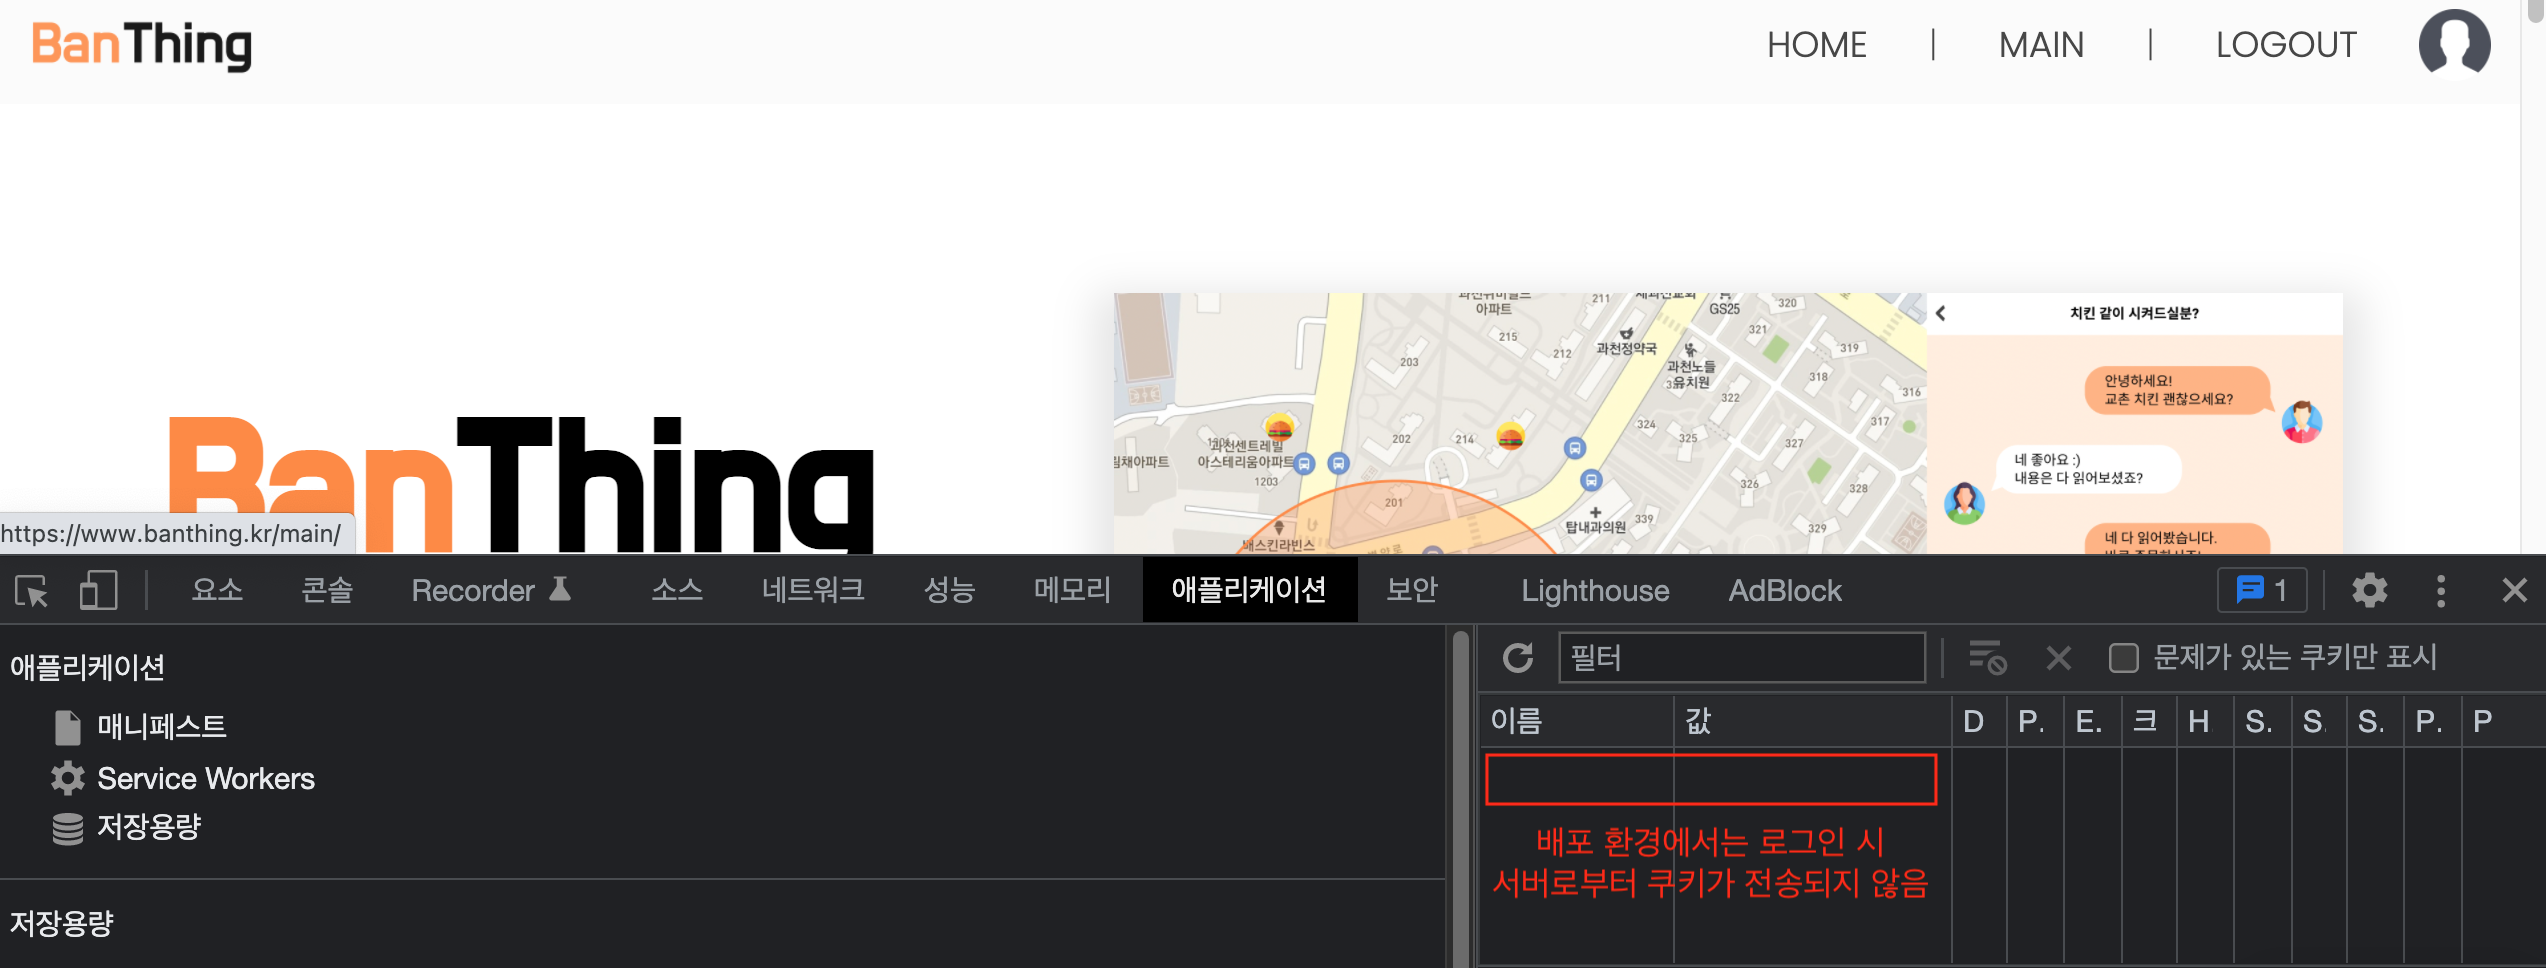
위의 사진과 같이 회원탈퇴 후 Main으로 redirect 되었을 때 로그아웃이 되있던 로컬환경과는 달리 배포환경에서는 로그아웃이 되있지 않았습니다.
이에 자세히 알아보니 아래 사진처럼 로그인 시 서버로부터 쿠키를 받아오지 못하고 있었기에 발생한 이슈였습니다.

> 로컬환경 : 서버로부터 쿠키를 받아옴
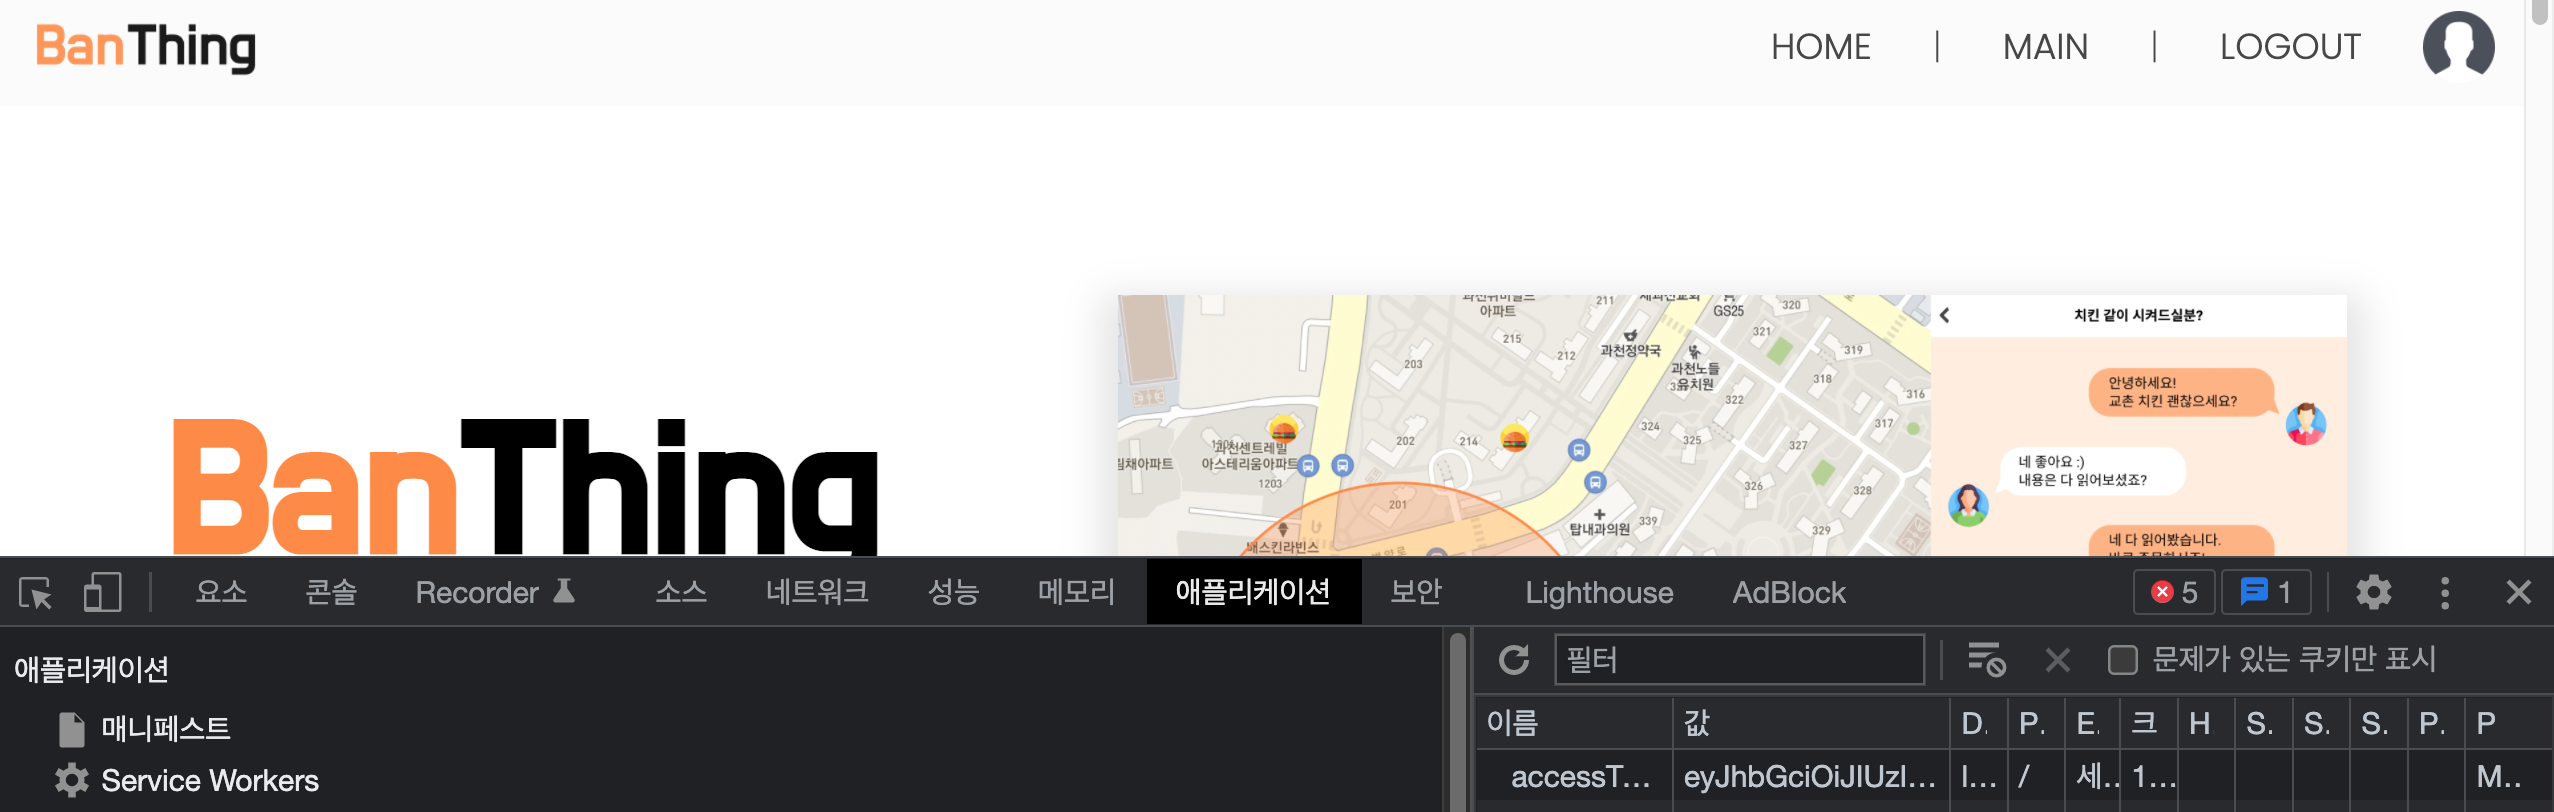
스크린샷 2022-02-26 오후 2 29 55

> 배포환경 : 서버로부터 쿠키를 받아오지 못함
스크린샷 2022-02-26 오후 2 30 46

### 에러 핸들링 방법
#### Domain 에러?
![2022-02-26_10 48 38](https://user-images.githubusercontent.com/85833148/155869055-7123e228-663b-4d3c-8208-198c74aed36a.png)
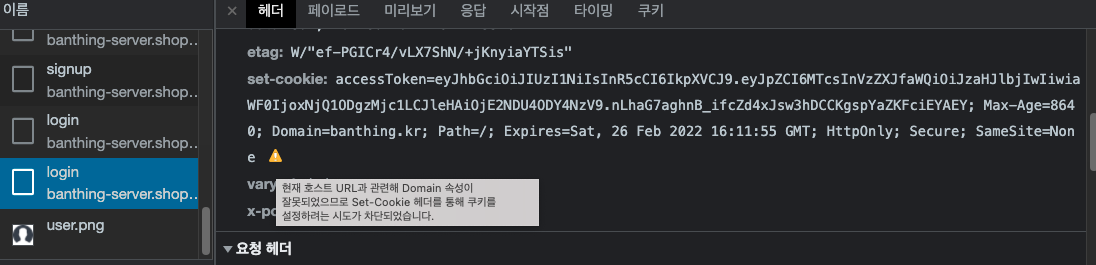
> [영문에러명]: This Set-Cookie was blocked because its Domain attribute is invalid with regards to the current host URL

네트워크 탭에서 좀더 자세히 살펴보니 위와 같은 에러가 발생함을 확인하였습니다. 이에 대한 내용을 검색해보니, Front-end와 API 서버의 도메인이 일치해야지만 쿠키가 전송가능함을 알게 되었습니다.

![스크린샷 2022-02-27 오후 2 10 56](https://user-images.githubusercontent.com/85833148/155869120-db8d3e34-19f0-409a-a955-384c7d876bc6.png)
> [의역] "조금 더 뻘짓을 하다 보니 front-end와 api서버는 같은 도메인이어야 한다는 것을 알게 됬다. 좀 당황스러웠는데 왜냐면 개발환경에서는 (쿠키에) domain은 속성을 명시하지 않음으로써 서로다른 도메인을 가질 수 있었기 때문이다. 그래서 배포환경에서도 그것이 가능할 줄 알았다. 하지만 개발환경에서는 (쿠키의) domain 속성을 명시해야하며, 또한 front-end와 API서버는 같은 도메인이어야 동작한다."

#### 클라이언트랑 서버를 위해 도메인을 2개를 살 필요가 없었다.
저의 경우 client는 `banthing.kr`, server는 `banthing-server.shop`이라는 도메인을 각각 2만원을 지불하여 1년 사용권리를 획득했는데, 이럴 필요가 없었던 것입니다.. 😭 정확히는 이럴 필요가 없었다기 보단 이렇게 하면 안되는 것이겠습니다. 그렇기에 banthing.kr의 서브도메인인 api.banthing.kr을 서버용 도메인으로 사용하기로 결정하였습니다. 다음과 같은 순서로 진행하였습니다.

#### 1. 해당 도메인으로 SSL 인증서 등록
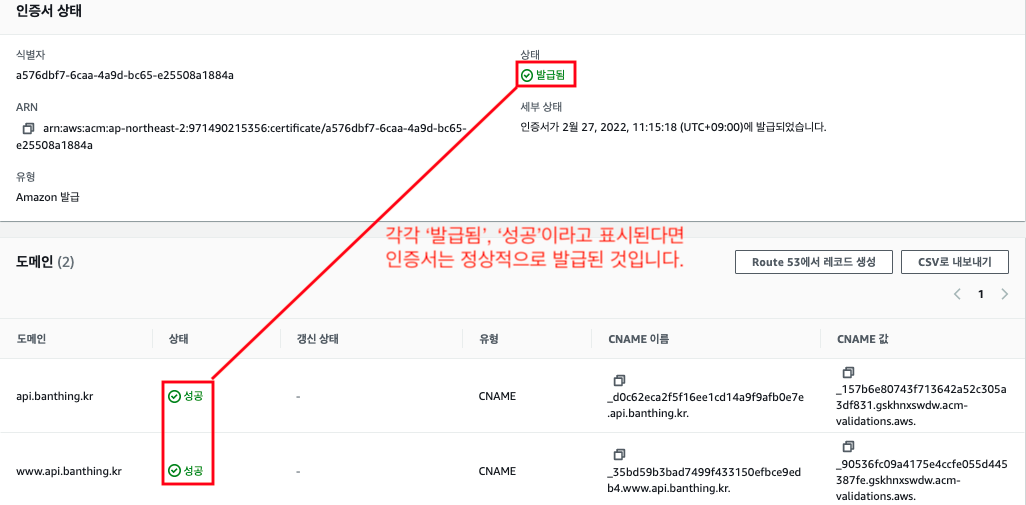
`AWS Certificate Manager`에서 `api.banthing.kr`, `www.api.banthing.kr`, 총 2개의 도메인으로 인증서를 등록합니다.
![스크린샷 2022-02-27 오후 2 26 12](https://user-images.githubusercontent.com/85833148/155869491-c4282e2e-b988-4589-bb7a-f10ba6abb46d.png)
최종적으로 아래사진과 같이 나온다면 인증서는 정상적으로 발급이 된 것입니다.

![스크린샷 2022-02-27 오후 2 23 25](https://user-images.githubusercontent.com/85833148/155869373-63e827a4-8bea-4dea-9e9c-6c4e038be06b.png)

#### 2. Load Balancer 생성
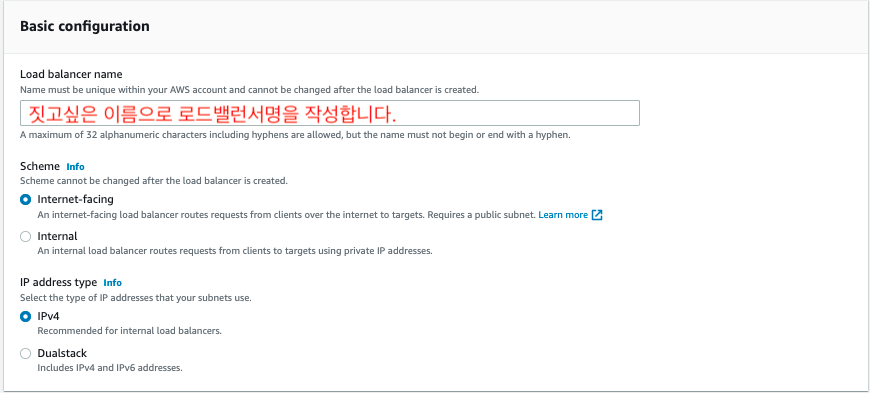
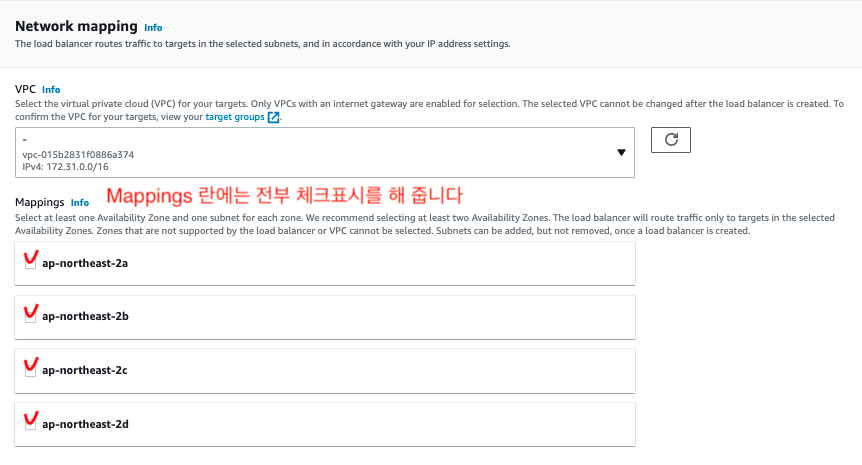
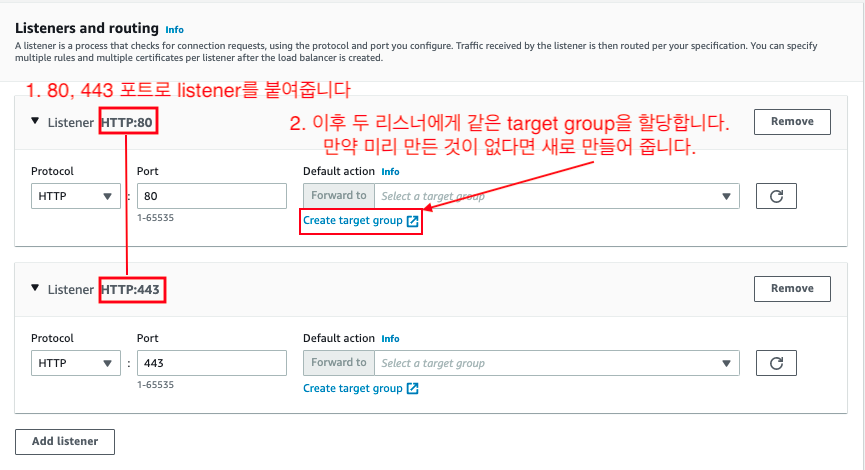
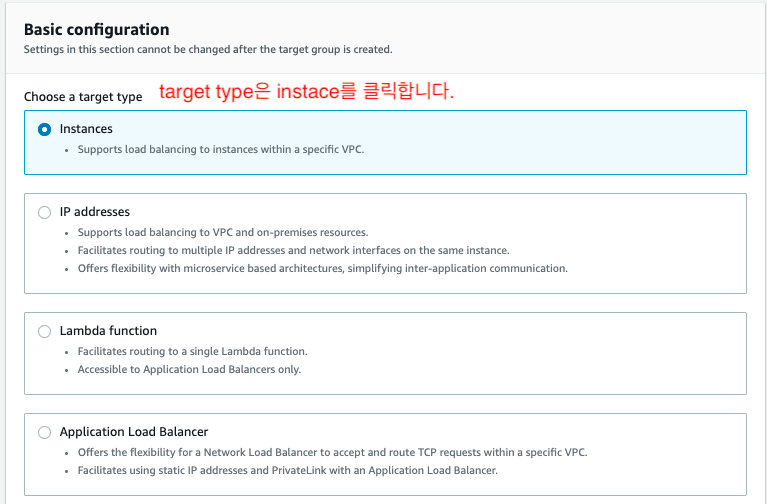
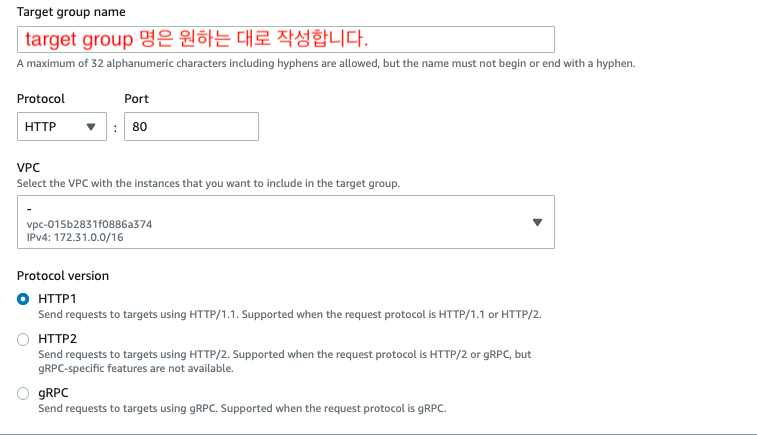
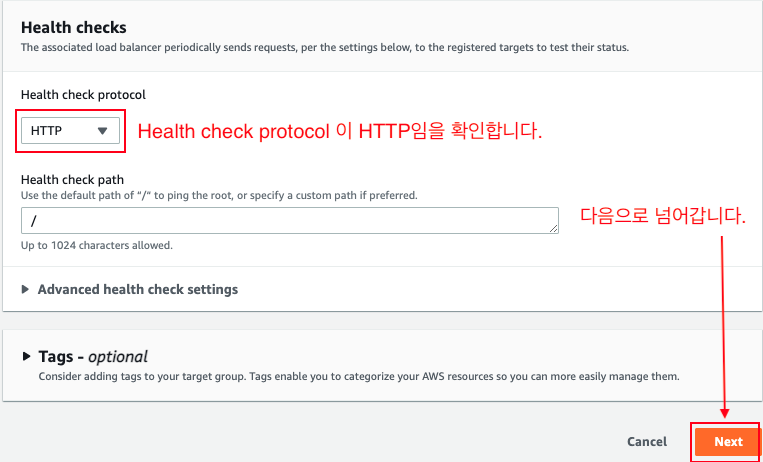
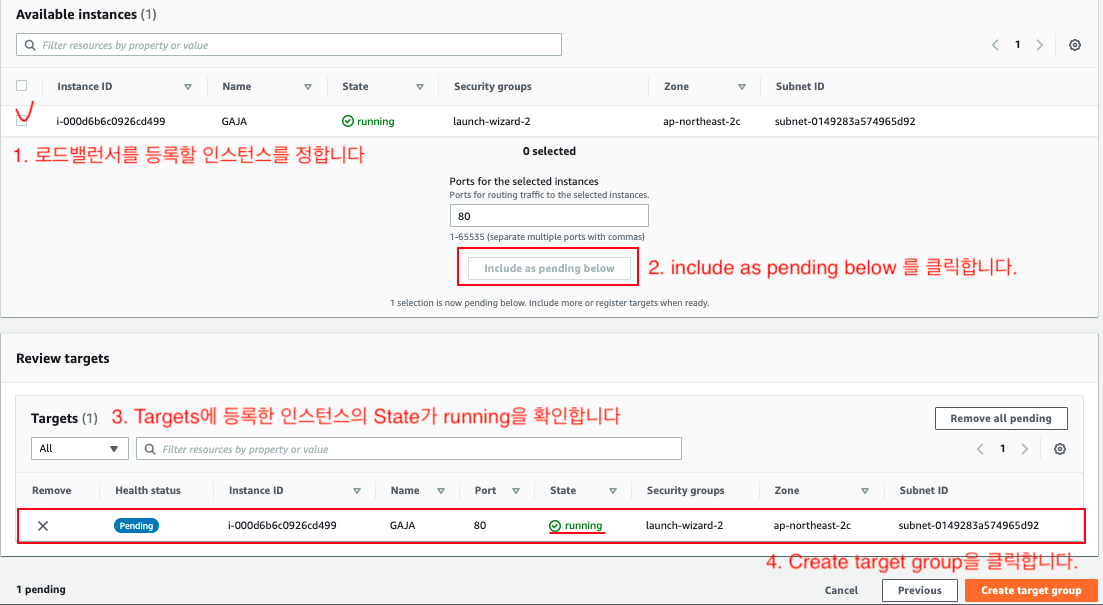
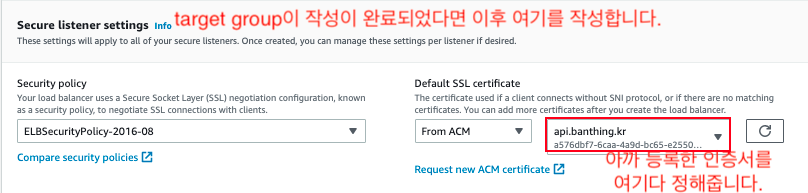
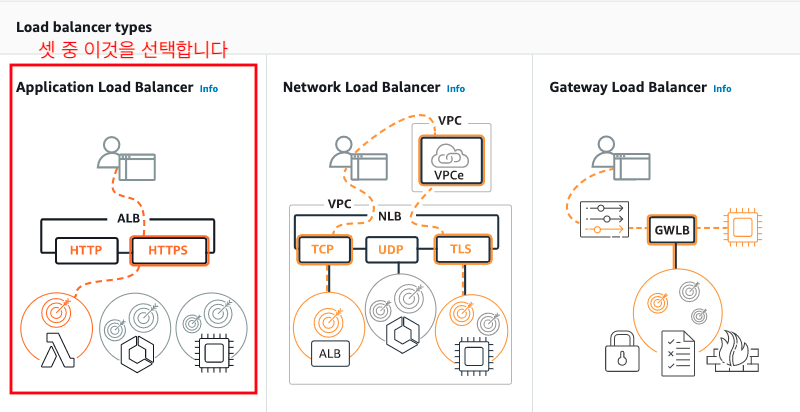
EC2 탭으로 이동하셔서 로드 밸런서를 생성합니다.
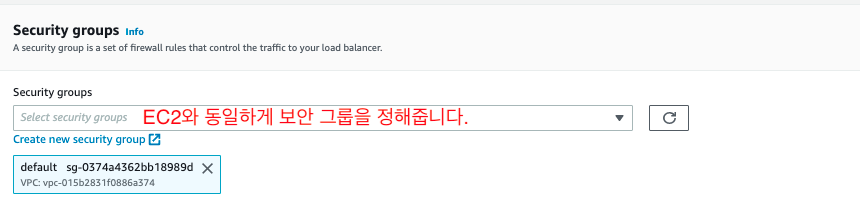
![스크린샷 2022-02-27 오후 2 31 36](https://user-images.githubusercontent.com/85833148/155869578-f1e675c7-38a6-4d93-9731-3992923d8447.png)
![스크린샷 2022-02-27 오후 2 33 22](https://user-images.githubusercontent.com/85833148/155869617-135fac01-da11-4e78-9a1c-c18751530e12.png)
![스크린샷 2022-02-27 오후 2 34 21](https://user-images.githubusercontent.com/85833148/155869672-ccfcc16f-142a-4df5-b410-47a4b53f1058.png)
![스크린샷 2022-02-27 오후 2 37 11](https://user-images.githubusercontent.com/85833148/155869705-486a33a0-6df2-4b1f-8fca-09943dd90f09.png)
![스크린샷 2022-02-27 오후 2 43 39](https://user-images.githubusercontent.com/85833148/155869945-f018c6e9-c614-4a5e-acdf-f4c3bd1d8a93.png)
![스크린샷 2022-02-27 오후 2 48 55](https://user-images.githubusercontent.com/85833148/155870171-922f33be-817a-41b3-be04-4b179f6a0111.png)
![스크린샷 2022-02-27 오후 2 49 13](https://user-images.githubusercontent.com/85833148/155870173-f287d469-e4b7-4dc2-b8ee-6ef1e6801b9f.png)
![스크린샷 2022-02-27 오후 2 49 22](https://user-images.githubusercontent.com/85833148/155870175-c7f24f4c-c75d-4dea-b2d6-bb29a5e3583d.png)
![스크린샷 2022-02-27 오후 2 50 02](https://user-images.githubusercontent.com/85833148/155870180-1817d7cb-f12b-4bbc-8c99-1c689871fa90.png)
![스크린샷 2022-02-27 오후 3 00 23](https://user-images.githubusercontent.com/85833148/155870339-f9d78dd1-d17b-4ecc-83b6-5f9b25eeeb81.png)
![스크린샷 2022-02-27 오후 3 08 36](https://user-images.githubusercontent.com/85833148/155870548-1da15db0-a82b-4308-b2b4-fa5e3b782413.png)

이후 가장 밑의 있는 주황색 버튼으로 된 `Create load balancer`를 클릭하면 load balancer를 생성할 수 있습니다.

#### 3. load balancer 리스너 설정
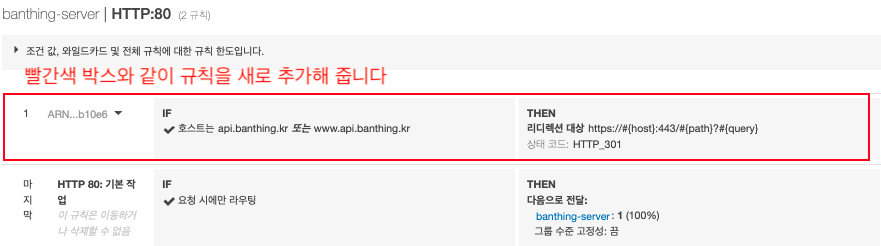
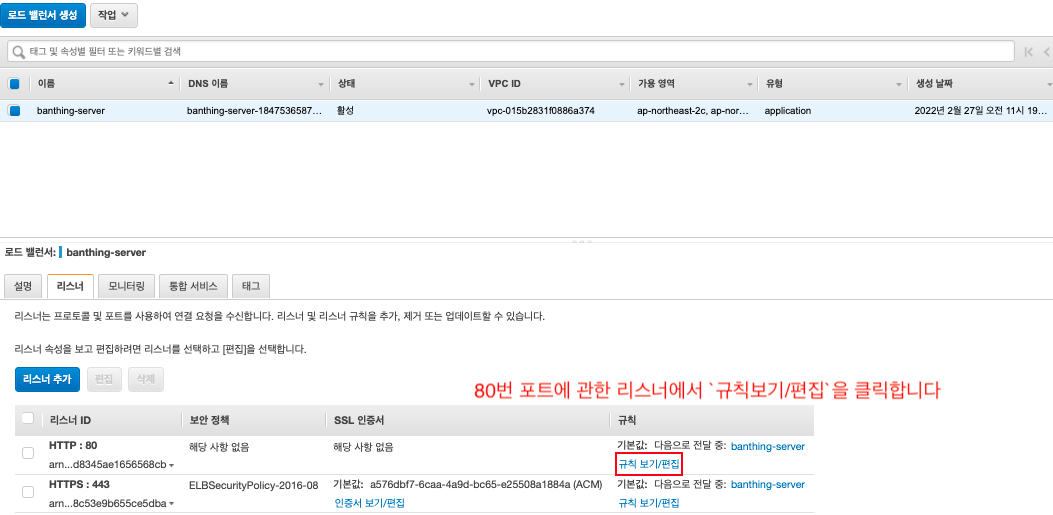
위의 과정을 잘 따라갔다면 아래 사진처럼 되어있을 것입니다. 80번 포트의 `규칙보기/편집`을 클릭합니다.
![스크린샷 2022-02-27 오후 3 04 19](https://user-images.githubusercontent.com/85833148/155870443-bee3df31-b5ba-4f7b-a5cf-ff85fce5b146.png)
![스크린샷 2022-02-27 오후 3 06 12](https://user-images.githubusercontent.com/85833148/155870493-96fadb85-db0c-479d-a792-1a02dc35fa4c.png)

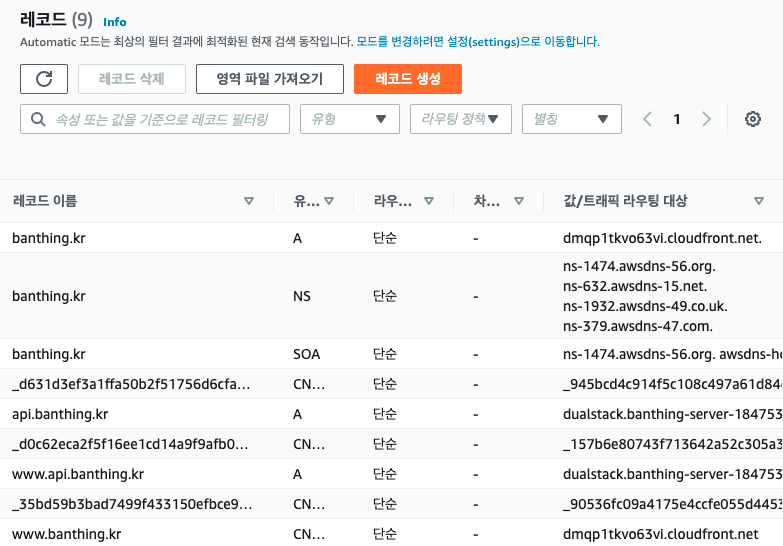
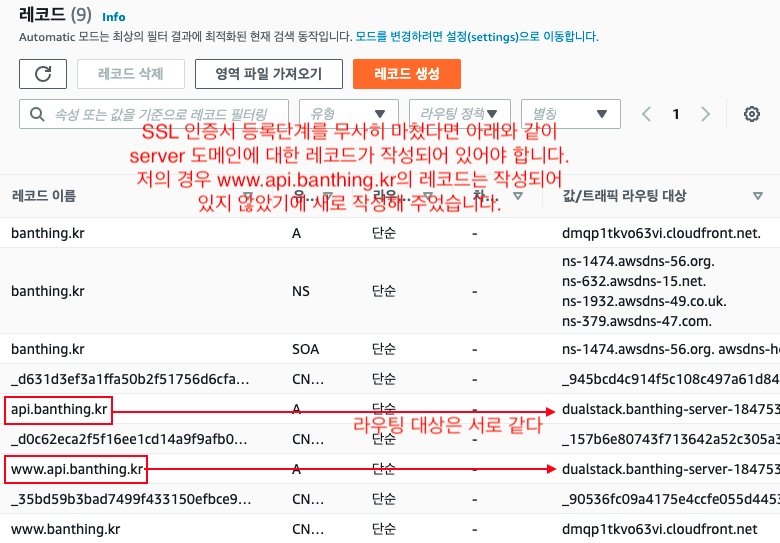
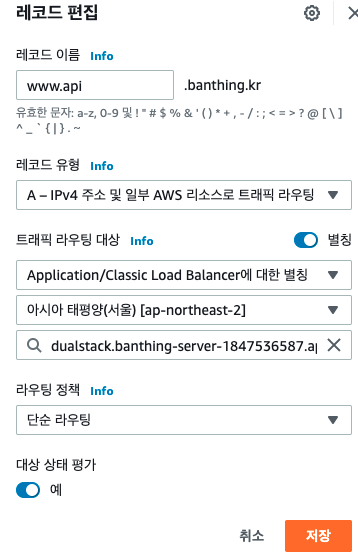
#### 4. Route 53에 레코드 추가
![스크린샷 2022-02-27 오후 3 08 52](https://user-images.githubusercontent.com/85833148/155870658-cbada7cb-d7bb-4887-9ad1-1bf9b6ec9088.png)
![스크린샷 2022-02-27 오후 3 12 41](https://user-images.githubusercontent.com/85833148/155870661-bfaac07e-49b6-4e5e-a27f-b1358a780863.png)

#### 5. 서버 코드 수정
스크린샷 2022-02-27 오후 3 14 42

로그인 시 브라우저로 쿠키를 전송하는 코드입니다. 배포 환경에서는 반드시 `domain` 속성을 명시해야 하며, `api.banthing.kr`은 `banthing.kr`의 하위 도메인이기 때문에 `banthing.kr`이 아닌 `.banthing.kr`로 작성합니다.

#### 해결!
![스크린샷 2022-02-27 오후 3 18 19](https://user-images.githubusercontent.com/85833148/155870806-37502098-e6fe-4efb-965f-1eea9a212829.png)
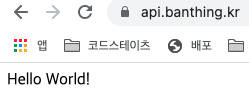
모든 과정을 완료하면 위와 같이 api.banthing.kr이 서버 도메인이 되며, 최초 발생했던 쿠키 전송문제는 더 이상 발생하지 않았습니다.
이 문제를 해결한다고 상당히 많은 시간을 소비하였지만 그만큼 값진 경험을 한 것 같습니다!

### 에러 핸들링을 위해 참고한 레퍼런스 링크
[SameSite Policy](https://www.hahwul.com/2020/01/18/samesite-lax/)
[Next.js에서 cookie에 옵션 붙히는 법](https://stackoverflow.com/questions/66346501/how-to-set-http-only-cookie-in-nestjs)
[stackoverflow 해당 내용](https://stackoverflow.com/questions/62749492/set-cookie-was-blocked-because-its-domain-attribute-was-invalid-with-regards-to)
[domain이 다르면 cookie가 전송안됨](https://42place.innovationacademy.kr/archives/8950)

Contributor guide

No contributing guide indexed for this repository

Assessment

This issue has not been assessed yet.

Get new issues in your inbox

A short digest of beginner-friendly GitHub issues.